|
Mage_Core_Model_Cache的构造函数有如下代码:
|
1
2
3
|
$this->_frontend = Zend_Cache::factory('Varien_Cache_Core', $backend['type'], $frontend, $backend['options'],
true, true, true
);
|
这里生成一个缓存对象,前端是Varien_Cache_Core,后端是$backend['type']。
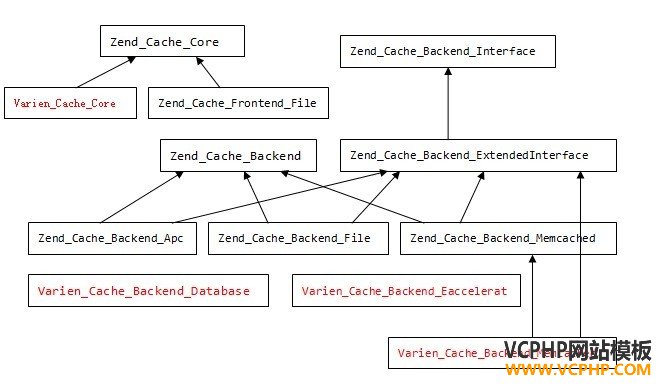
首先,Magento中实现了自己的前端Varien_Cache_Core,Varien_Cache_Core直接继承自Zend_Cache_Core,跟Zend Framework中的中Zend_Cache_Frontend_File、Zend_Cache_Frontend_File_Output、Zend_Cache_Frontend_Page等是一个层次的,本身它们都不太复杂,实际上是设置前端配置参数,比如缓存生存时间等,另一个就是调用后端保存/取回/清除缓存。实际上更多是使用Zend_Cache_Core提供的封装方法(Magento中还使用了一个Mage_Core_Model_Cache来封装前端操作)。
Zend Framework中缓存的后端有很多类型,每个后端都需要是实现Zend_Cache_Backend_ExtendedInte接口(这个即可又从Zend_Cache_Backend_Interface继承)和继承自Zend_Cache_Backend,Zend Framework中提供的缓存后端有:
Zend_Cache_Backend_File
Zend_Cache_Backend_Sqlite
Zend_Cache_Backend_Memcached
Zend_Cache_Backend_Apc
Zend_Cache_Backend_Xcache
Zend_Cache_Backend_ZendPlatform
Zend_Cache_Backend_Libmemcached
Zend_Cache_Backend_TwoLevels //封装其它后端,实现慢快保存
我们可以看到,ZF并没有提供针对Database和Eaccelerat的后端类型,所以Magento添加了这两种。另外,使用Varien_Cache_Backend_Memcached扩展了Zend_Cache_Backend_Memcached(从Magento源代码看来Varien_Cache_Backend_Memcached并没有在Magento中使用)。
我们可以从Magento的Mage_Core_Model_Cache的_getBackendOptions方法中知道,它支持的后端类型有sqlite、memcached、apc、xcache、eaccelerator、database、file。
缓存对象一般指前端对象(也可能使用另外一个对象进行封装),前端对象必定需要一个后端为它服务。一般不直接实例化前端对象,而是使用Zend_Cache的factory方法:
|
1
2
3
4
5
6
7
8
9
10
11
12
13
|
public static function factory($frontend, $backend, $frontendOptions = array(), $backendOptions = array(), $customFrontendNaming = false, $customBackendNaming = false, $autoload = false)
{
if (is_string($backend)) {
$backendObject = self::_makeBackend($backend, $backendOptions, $customBackendNaming, $autoload);
} else {
}
if (is_string($frontend)) {
$frontendObject = self::_makeFrontend($frontend, $frontendOptions, $customFrontendNaming, $autoload);
} else {
}
$frontendObject->setBackend($backendObject);
return $frontendObject;
}
|
$frontend和$backend一般都是使用字符串(也可以传递具体的对象,必须是符合类型的),$frontendOptions和$backendOptions对应前端和后端需要使用参数,$customFrontendNaming和$customBackendNaming表示是否使用自定义的命名,$autoload表示当使用自定义的命名时,是否自定装载类。
在初始化后端时,调用了_makeBackend,它的$frontend是一个字符串,不管怎么样,首先匹配标准的后端,如果无法匹配,就根据$customBackendNaming进行类名组装,如果是ture,直接就把$frontend作为了类名。所以,如果使用自定义的后端类,需要把它设置为true并且要把全类名传递进来, $autoload为true还会检查类名是否可读,最终把$backendOptions传递到构造函数中,返回这个后端实例。_makeFrontend函数跟这个过程一样。
由于后端基本都实现Zend_Cache_Backend_ExtendedInterface和Zend_Cache_Backend_Interface接口:
|
1
2
3
4
5
6
7
8
9
10
11
12
13
14
15
16
17
18
|
// Zend_Cache_Backend_Interface
public function setDirectives($directives);
public function load($id, $doNotTestCacheValidity = false);
public function test($id);
public function save($data, $id, $tags = array(), $specificLifetime = false);
public function remove($id);
public function clean($mode = Zend_Cache::CLEANING_MODE_ALL, $tags = array());
//Zend_Cache_Backend_ExtendedInterface
public function getIds();
public function getTags();
public function getIdsMatchingTags($tags = array());
public function getIdsNotMatchingTags($tags = array());
public function getIdsMatchingAnyTags($tags = array());
public function getFillingPercentage();
public function getMetadatas($id);
public function touch($id, $extraLifetime); //修改时间
public function getCapabilities();
|
Zend_Cache_Backend_Interface提供了最基本的保存、取回、清除缓存的方法。Zend_Cache_Backend_ExtendedInterface提供了管理缓存的基本方法。
后端还会继承Zend_Cache_Backend,它提供了后端一般实现,注意,后端是直接实现以上接口的,所有后端需要直接实现接口方法。比如setOption()选项保存到_options属性中。看它的构造函数:
|
1
2
3
4
5
6
|
public function __construct(array $options = array())
{
while (list($name, $value) = each($options)) {
$this->setOption($name, $value);
}
}
|
以下以文件后端(Zend_Cache_Backend_File)为例,探讨它的内部细节。首先看构造函数:
|
1
2
3
4
5
6
7
8
9
10
11
12
13
14
15
16
17
18
19
20
21
22
23
24
25
|
public function __construct(array $options = array())
{
parent::__construct($options); //设置_options
if ($this->_options['cache_dir'] !== null) { // particular case for this option
$this->setCacheDir($this->_options['cache_dir']);
} else {
$this->setCacheDir(self::getTmpDir() . DIRECTORY_SEPARATOR, false);
}
if (isset($this->_options['file_name_prefix'])) { // particular case for this option
if (!preg_match('~^[a-zA-Z0-9_]+$~D', $this->_options['file_name_prefix'])) {
Zend_Cache::throwException('Invalid file_name_prefix : must use only [a-zA-Z0-9_]');
}
}
if ($this->_options['metadatas_array_max_size'] < 10) {
Zend_Cache::throwException('Invalid metadatas_array_max_size, must be > 10');
}
if (isset($options['hashed_directory_umask']) && is_string($options['hashed_directory_umask'])) {
// See #ZF-4422
$this->_options['hashed_directory_umask'] = octdec($this->_options['hashed_directory_umask']);
}
if (isset($options['cache_file_umask']) && is_string($options['cache_file_umask'])) {
// See #ZF-4422
$this->_options['cache_file_umask'] = octdec($this->_options['cache_file_umask']);
}
}
|
这里主要对Options值进行纠正。这个类内部有一个默认值:
|
1
2
3
4
5
6
7
8
9
10
11
|
protected $_options = array(
'cache_dir' => null, //缓存目录
'file_locking' => true, //文件锁
'read_control' => true, //读控制
'read_control_type' => 'crc32', //读控制类型
'hashed_directory_level' => 0, //采用几层目录存储
'hashed_directory_umask' => 0700, //目录umask
'file_name_prefix' => 'zend_cache', //文件名前缀
'cache_file_umask' => 0600, //缓存文件umask
'metadatas_array_max_size' => 100 //元数据数组最大大小
);
|
从构造函数中可知,如果如果没有传递cache_dir,那么它自动去寻找系统临时目录。下面跟踪save方法的实现:
|
1
2
3
4
5
6
7
8
9
10
11
12
13
14
15
16
17
18
19
20
21
22
23
24
25
26
27
28
29
30
31
32
33
|
public function save($data, $id, $tags = array(), $specificLifetime = false)
{
clearstatcache();
$file = $this->_file($id);
$path = $this->_path($id);
if ($this->_options['hashed_directory_level'] > 0) {
if (!is_writable($path)) {
// maybe, we just have to build the directory structure
$this->_recursiveMkdirAndChmod($id);
}
if (!is_writable($path)) {
return false;
}
}
if ($this->_options['read_control']) {
$hash = $this->_hash($data, $this->_options['read_control_type']);
} else {
$hash = '';
}
$metadatas = array(
'hash' => $hash,
'mtime' => time(),
'expire' => $this->_expireTime($this->getLifetime($specificLifetime)),
'tags' => $tags
);
$res = $this->_setMetadatas($id, $metadatas);
if (!$res) {
$this->_log('Zend_Cache_Backend_File::save() / error on saving metadata');
return false;
}
$res = $this->_filePutContents($file, $data);
return $res;
}
|
首先获取将要缓存的文件的完整路径,然后是文件前缀。举例来说,文件名为Test_Cache,路径为/tmp/, file_name_prefix设置为zen_cache:
//hashed_directory_level为2
/tmp/zen_cache--*/zen_cache--**/
/tmp/zen_cache--*/zen_cache--**/zen_cache---Test_Cache

#如果hashed_directory_level为1
/tmp/zen_cache--*/
/tmp/zen_cache--*/zen_cache---Test_Cache

#如果没有设置hashed_directory_level(默认为0)
/tmp/zen_cache/
/tmp/zen_cache/zen_cache---Test_Cache
注意这里的*代表一个字符,是对文件名字进行哈希得来的。文件的存储路径和名字已经确定,接下来可能需要创建目录(如果是多层目录存放,这个时候hashed_directory_umask设置会直接影响创建目录的权限)。然后是判断是否有读控制(默认是true),如果true就使用read_control_type指定的类型获取数据哈希(就是数据签名,用来作为缓存的元数据),然后设置元数据:
|
1
2
3
4
5
6
7
|
$metadatas = array(
'hash' => $hash,
'mtime' => time(),
'expire' => $this->_expireTime($this->getLifetime($specificLifetime)),
'tags' => $tags
);
$res = $this->_setMetadatas($id, $metadatas);
|
如果跟踪下去,它和保存缓存文件的过程非常类似(在进入_setMetadatas时,会对$metadatas数组是否大于metadatas_array_max_size进行判断,如果大于就进行裁切)。这里需要提一下的,缓存文件是创建时间 和 过期时间是放入元数据文件中的。
最后:
|
1
2
|
$res = $this->_filePutContents($file, $data);
return $res;
|
把数据保存到文件,返回是否成功的状态。
然后简单看下load()方法:
|
1
2
3
4
5
6
7
8
9
10
11
12
13
14
15
16
17
18
19
20
21
22
23
|
public function load($id, $doNotTestCacheValidity = false)
{
//测试是否命中,$doNotTestCacheValidity控制是否检查缓存有没有过期,如果为false,则检查,也是默认值,这样可以避免很多问题
if (!($this->_test($id, $doNotTestCacheValidity))) {
// The cache is not hit !
return false;
}
$metadatas = $this->_getMetadatas($id);
$file = $this->_file($id);
$data = $this->_fileGetContents($file);
//如果设置了读控制,则会校验数据hash,如果读出来的数据的hash和元数据hash不一样,说明这个缓存有问题,记录日志后将它删除
if ($this->_options['read_control']) {
$hashData = $this->_hash($data, $this->_options['read_control_type']);
$hashControl = $metadatas['hash'];
if ($hashData != $hashControl) {
// Problem detected by the read control !
$this->_log('Zend_Cache_Backend_File::load() / read_control : stored hash and computed hash do not match');
$this->remove($id);
return false;
}
}
return $data;
}
|
读写文件需要用到file_locking和cache_file_umask的配置。
接下来看看remove
|
1
2
3
4
5
6
7
|
public function remove($id)
{
$file = $this->_file($id);
$boolRemove = $this->_remove($file);
$boolMetadata = $this->_delMetadatas($id);
return $boolMetadata && $boolRemove;
}
|
根据ID把缓存文件和对应的元数据删除。除了这个方法,还提供了更加通用的方法:
|
1
2
3
4
5
6
|
public function clean($mode = Zend_Cache::CLEANING_MODE_ALL, $tags = array())
{
// We use this protected method to hide the recursive stuff
clearstatcache();
return $this->_clean($this->_options['cache_dir'], $mode, $tags);
}
|
Zend_Cache提供了预定义的几个模式:
|
1
2
3
4
5
|
const CLEANING_MODE_ALL = 'all';
const CLEANING_MODE_OLD = 'old';
const CLEANING_MODE_MATCHING_TAG = 'matchingTag';
const CLEANING_MODE_NOT_MATCHING_TAG = 'notMatchingTag';
const CLEANING_MODE_MATCHING_ANY_TAG = 'matchingAnyTag';
|
clean方法根据不同模式,第二参数需要给定Tag。
还有其它一些有用方法,比如touch, getIds, getTags, getMetadatas等,实际也不复杂,另外要注意的时候,获取缓存只能是用load()给出ID,不能使用tag来load,道理是很明白的。
不过这里讨论的后端的有用方法,一般都不是直接操作的,后端是为前端服务的,所有一般是用前端对象的方法(间接调用后端的方法),由于有很多不同类型的后端,所有引入前端的概念可以提供一个通用的方案。
在Magento中,对应了一个Mage_Core_Model_Cache的对象,它用来封装cache对象(它需要和数据库交互),App的_cache引用到这个对象,这个cache的_frontend属性引用的才是前端对象(Varien_Cache_Core),Mage_Core_Model_Cache的save方法对$tags数组中只要没有包含CONFIG这个tag,就统一在最后添加一个叫MAGE的tag。
Magento中的Mage_Core_Model_Cache对象的方法:
|
1
2
3
4
5
6
7
8
9
10
11
12
13
14
15
16
|
protected function _getFrontendOptions(array $cacheOptions)
{
$options = isset($cacheOptions['frontend_options']) ? $cacheOptions['frontend_options'] : array();
if (!array_key_exists('caching', $options)) {
$options['caching'] = true;
}
if (!array_key_exists('lifetime', $options)) {
$options['lifetime'] = isset($cacheOptions['lifetime']) ? $cacheOptions['lifetime']
: self::DEFAULT_LIFETIME;
}
if (!array_key_exists('automatic_cleaning_factor', $options)) {
$options['automatic_cleaning_factor'] = 0;
}
$options['cache_id_prefix'] = $this->_idPrefix;
return $options;
}
|
这里把_idPrefix赋值给$options['cache_id_prefix'],这个参数会被传入前端(已经写死了),覆盖前端对象的cache_id_prefix值,这里的_idPrefix如果配置文件中没有指定id_prefix,就使用prefix,如果还没有指定就是 ../app/etc目录MD5后取前三个字符加下滑线。
在Zend_Cache_Core中在保存 和 取出 和 清除缓存时,都会把id经过_id()方法过滤
|
1
2
3
4
5
6
7
|
protected function _id($id)
{
if (($id !== null) && isset($this->_options['cache_id_prefix'])) {
return $this->_options['cache_id_prefix'] . $id; // return with prefix
}
return $id; // no prefix, just return the $id passed
}
|
可以看到前端的_options的cache_id_prefix不为null,那么还会在id名前加上这个前缀。
我们可以从Zend_Cache_Core中获取可配置的前端参数:
|
1
2
3
4
5
6
7
8
9
10
11
|
protected $_options = array(
'write_control' => true,
'caching' => true,
'cache_id_prefix' => null,
'automatic_serialization' => false,
'automatic_cleaning_factor' => 10,
'lifetime' => 3600,
'logging' => false,
'logger' => null,
'ignore_user_abort' => false
);
|
Mage_Core_Model_Cache在_getFrontendOptions方法根据global/cache/ frontend_options的配置,设置caching,lifetime,automatic_cleaning_factor,这些如果没有配置就是它的默认值,所以基本是写死了。注意cache_id_prefix是真写死。从而知道它的配置模式:
|
1
2
3
4
5
6
7
8
9
|
<global>
<cache>
<frontend_option>
<caching />
<lifetime />
<automatic_cleaning_factor />
</frontend_option>
</cache>
</global>
|
所以,你看到magento中的缓存文件:
mage---841_TEST_CACHE
就不需要奇怪了,TEST_CACHE是ID, 841_则是MD5前三个字符加下划线。mage是缓存前缀,这个只有后端是File时才有的:
|
1
2
3
4
5
6
7
8
9
10
11
12
13
14
15
16
|
//Mage_Core_Model_Cache
protected $_defaultBackendOptions = array(
'hashed_directory_level' => 1,
'hashed_directory_umask' => 0777,
'file_name_prefix' => 'mage',
);
//进入default时$backendType 没有设置, 这里就是指后端是File时,看到把$_defaultBackendOptions传递入后端类型,那么file_name_prefix就被设置了,另外,默认hashed_directory_level是0,这里改为了1
if (!$backendType) {
$backendType = $this->_defaultBackend;
foreach ($this->_defaultBackendOptions as $option => $value) {
if (!array_key_exists($option, $options)) {
$options[$option] = $value;
}
}
}
|
hashed_directory_level是一层,file_name_prefix默认为mage,那么就产生这样的文件:
mage—1/mage---841_TEST_CACHE
你可以看到,以上那段代码是写死了的。意思是说,对于后端是File类型的,前缀必须是mage,层次只能是1,你可以把这里的1改成2,试手一下。
File的类型,很多参数都写死了。可用的参数:
|
1
2
3
4
5
6
7
8
9
10
11
|
protected $_options = array(
'cache_dir' => null, //写死为 /../var/cache
'file_locking' => true,
'read_control' => true,
'read_control_type' => 'crc32',
'hashed_directory_level' => 0, //写死为1
'hashed_directory_umask' => 0700, //写死为0511
'file_name_prefix' => 'zend_cache', //写死为mage
'cache_file_umask' => 0600,
'metadatas_array_max_size' => 100
);
|
可以通过配置来改变File类型的后端参数不多:
|
1
2
3
4
5
6
7
8
9
|
<global>
<cache>
<backend>File</backend>
<id_prefix></id_prefix>
<backend_options>
<cache_file_umask>0700</cache_file_umask>
</backend_options>
</cache>
</global>
|
不过你可以指定id_prefix,如果没有指定id_prefix就使用prefix作为id_prefix,否则就系统自动生成。prefix是id_prefix的候补(id_prefix更加明确,应该使用这个设置缓存名字的前缀),除此,没有其它作用。(在源码中,prefix没有传递到后端模型)
backend如果是File就可以省略。如果是其它类型就需要指定,比如APC,由于它是共享内存,一个名字对应一份缓存,所以这时候指定id_frefix非常有必要(如果是文件,存储路径会由于每个应用不同而不同),比如有一个叫tCache保存到了APC中,如果其它应用程序也设置了一个叫tCache的放入内存中,这样新的将覆盖旧的,那么你可能面临莫名其妙的错误。
另外,APC不支持tag。也没有backend_options需要设置。简单说就是backend指定为APC,id_prefix指定为缓存名前缀,Magento中的配置就完成了。
能够搞明白文件保存缓存的过程,对应比如apc等就很容易明白了。尽管ZF提供的实例化和管理缓存的方法已经很好了,但是Magento本身还是提供了一个自己的缓存抽象,它封装了自己的实现,实际上它是利用ZF缓存机制的非常成功的例子。不过,Magento最通用使用缓存的方法还不是直接操作它的Cache方法,通用的方法由Mage_Core_Model_App中提供:
|
1
2
3
4
5
6
|
public function getCacheInstance()
public function getCache()
public function loadCache($id)
public function saveCache($data, $id, $tags=array(), $lifeTime=false)
public function removeCache($id)
public function cleanCache($tags=array())
|
可以调用getCacheInstance获取Mage_Core_Model_Cache获取实例引用,然后通过它直接操作(它有save,load,remove, clear方法)。不过在Magento中只要记住通用方法即可。
(责任编辑:最模板) |