| 如何编辑在 Magento 的 «顶部链接»。
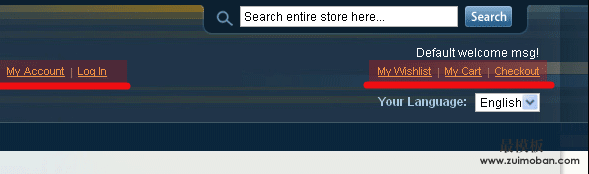
顶尖的所有链接都都基于坐落在这里的模板: page/template/links.phtml。在这里你可以添加额外的类或提交所需的更改。 人们常常想要使用单独的链接。例如登录/注销和我的账户应在左侧和我的心愿、 我的购物车和结帐的右侧。 在下面的示例类似:
我们可以让这几个简单的步骤,如下图所示:
打开page.xml并创建另一个块在那里,几乎完全相同的"topLinks" ,但与名称"topLinksLeft";
<block type=”page/html_header” name=”header” as=”header”>
<block type=”page/switch” name=”store_language” as=”store_language” template=”page/switch/languages.phtml”/>
<block type=”core/text_list” name=”top.menu” as=”topMenu”/>
<block type=”page/template_links” name=”top.links” as=”topLinks”/>
topLinksLeft”/>
</ block>
在模板template/page/html/header.phtml的命令的帮助:
1
php echo this->getChildHtml(‘topLinksLeft’) ?>
我们可以在适当的地方调用我们的块
<div>
<h1 id=”logo” title=”<?php echo $this->getLogoAlt() ?>” style=”background-image:url(<?php echo $this->getLogoSrc() ?>);”><a href=”<?php echo $this->getUrl(”) ?>”><?php echo $this->getLogoAlt() ?></a></h1>
<div><?php echo $this->getChildHtml(‘topLinksLeft’) ?></div>
<?php echo $this->getChildHtml(‘topLinks’) ?>
<?php echo $this->getChildHtml(‘topMenu’) ?>
</div>
当你做了时,打开customer.xml在这里我们要更改的块体是负责登录/注销,我的账户的名称。我们正在改变它的名字从"top.links"上"top.links.left",如示例所示:
<customer_logged_in>
<reference name=”top.links.left”>
<action method=”addLink” translate=”label title” module=”customer”><label>My Account</label><url helper=”customer/getAccountUrl”/><title>My Account</title><prepare/><urlParams/><position>10</position></action>
</reference>
<reference name=”top.links.left”>
<action method=”addLink” translate=”label title” module=”customer”><label>Log Out</label><url helper=”customer/getLogoutUrl”/><title>Log Out</title><prepare/><urlParams/><position>100</position></action>
</reference>
</customer_logged_in>
我们也可以其他将模板分配给在左边 (在某些情况下是很有用) 的链接我们只是在重复模板"page/template/links.phtml"而且叫它 links_left.phtml。所以现在我们有 2 个模板右侧的"links.phtml"和"links_left.phtml"的左侧。现在我们需要做的就是只要将它连接。对于连接我们使用块 «topLinksLeft» page.xml 并将其更改为links_left.phtml.
<block type=”page/html_header” name=”header” as=”header”>
<block type=”page/template_links” name=”top.links” as=”topLinks”/>
<block type=”page/template_links” name=”top.links.left” as=”topLinksLeft” template=”page/template/links_left.phtml” />
</ block>
现在你可以应用不同的样式和 HTML 左侧和右侧。
哇,几乎忘了这通常位于"登录/注销"按钮的"注册"按钮。不用担心,以及。因为你已经能猜到我们从客户开始。在这里我们做下一步,如果我们想要将"注册"按钮添加到顶部链接的 xml 文件:
<customer_logged_out>
<reference name=”top.links”>
<action method=”addLink” translate=”label title” module=”customer”> <label> Log In </ label> <url helper=”customer/getLoginUrl”/> <title> Log In </ title> <prepare /> <urlParams/> <position> 100 </ position> </ action>
<action method=”addLink” translate=”label title” module=”customer”> <label> register </ label> <url helper=”customer/getRegisterUrl”/><title>register</title><prepare/><urlParams/><position>10</position></action>
</ reference>
</ customer_logged_out>
编码愉快 !
(责任编辑:最模板) |
如何更改和改进 Magento 的顶部链接(2)
时间:2014-08-02 17:31来源:未知 作者:最模板 点击:次
如何编辑在 Magento 的 顶部链接。 顶尖的所有链接都都基于坐落在这里的模板: page/template/links.phtml。在这里你可以添加额外的类或提交所需的更改。 人们
顶一下
(0)
0%
踩一下
(0)
0%
------分隔线----------------------------
- 热点内容
-
- Magento My Orders里面不显示订单,提示
Magento My Orders里面不显示订单,提示”You Have Placed No Orders”...
- 如何设置和使用Magento通讯
首先,请确保在您的网站启用了您的新闻稿。从 Magento 的仪表板...
- magento在不同的模块分别覆盖原来的
magento在不同的模块分别覆盖原来的model、block,假如有packageA的...
- Magento 头部调用的几种方法
magento所有的页面都是用一个头部header,我们怎样定义多个header来...
- 如何创建自定义magento属性源类型
你是否曾经需要创建magento自定义属性源类型?下面的小示例可能...
- Magento My Orders里面不显示订单,提示
- 随机模板
-
-
 ecshop红色综合商城(推荐
人气:1599
ecshop红色综合商城(推荐
人气:1599
-
 ecshop仿1mall网上超市整站免
人气:7963
ecshop仿1mall网上超市整站免
人气:7963
-
 Welldone外贸综合时尚设计
人气:203
Welldone外贸综合时尚设计
人气:203
-
 ecshop免费模板之Superfly整站
人气:5360
ecshop免费模板之Superfly整站
人气:5360
-
 ecshop仿2011最新走秀网
人气:1700
ecshop仿2011最新走秀网
人气:1700
-
 ecshop成人用品简洁模板
人气:722
ecshop成人用品简洁模板
人气:722
-