要提纲: 一、表视图 二、UITableViewCell的重用机制 三、UITableview的相关配置(代理方法) 四、UITableView自适应高速 五、UITableView的编辑(增、删、移动) 六、成品展示 一、表视图(UItableView)1、什么是表视图?表视图 UITableView,iOS中最重要的视图,随处可 。 表视图通常 来管理 组具有相同数据结构的数据。 例图: 
UITableView的使用图片.png 二、UITableViewCell的重用机制1、为什么要使用UITableViewCell的重用机制?表视图的重用机制:当表视图的单元格超过一屏幕时,这时就会启动cell重用机制。当滑动时单元格出屏幕时,就会把相同格式的单元格放在同一个集合中,为这个集合添加标识符,当我们需要使用某种样式的单元格时,根据不同的标示符,从集合中寻找单元格,出屏幕的cell会被添加到mutableSet中,进入屏幕的cell,先从set中获取,如果获取不到,才创建一个cell。在cell显示之前,给cell赋上相应的内容。
// 定义单元格    indexPath:单元格当前所在的位置
- (UITableViewCell *)tableView:(UITableView *)tableView cellForRowAtIndexPath:(NSIndexPath *)indexPath{
    // 相当于从集合中找寻完全出屏幕的单元格
    // identifier: 因为一个表视图中可能存在多种样式的单元格,咋们把相同格式的单元格放在同一个集合里,为这个集合加标识符,当我们需要用到某种样式的单元格时,根据不同的标识符,从集合中找寻单元格
    static NSString *identifier = @"cell";
    UITableViewCell *cell = [tableView dequeueReusableCellWithIdentifier:identifier];
    // 如果从集合中未找到单元格,也就是集合中还没有单元格,也就是还没有单元格完全出屏幕,那么我们就需要创建单元格
    if (!cell) {
        // 创建cell的时候需要标示符,是因为当该cell触屏幕的时候需要根据标示符放到对应的集合中
        cell = [[UITableViewCell alloc] initWithStyle:UITableViewCellStyleSubtitle reuseIdentifier:identifier];
    }
三、UITableview的相关配置(代理方法)1 、UITableView的创建与配置
#import "RootViewController.h"
@interface RootViewController ()<UITableViewDataSource,UITableViewDelegate>
@property (nonatomic,retain)NSArray *dataArray; // 数据源,用来给cell赋值的
@property (nonatomic,retain)NSArray *dataArray1;
@property (nonatomic,retain)NSDictionary *datadic;
@property (nonatomic,retain)NSMutableArray *titleArray;  // 用来盛放头标题

@end

@implementation RootViewController

- (void)viewDidLoad {
    [super viewDidLoad];
    //  初始化数据源并且添加数据
    self.dataArray = [NSArray arrayWithObjects:@"小心如",@"林心如",@"赵薇",@"林志颖",
                                               @"LOL",@"刘毅",@"仝文哲",@"成龙",
                                               @"丁大",@"武松", nil];
    self.dataArray1 = [NSArray arrayWithObjects:@"大乔恩",@"陈乔恩",@"赵薇",@"林志颖",
                       @"LOL",@"刘毅",@"仝文哲",@"成龙",
                       @"丁大",@"武松", nil];

    self.datadic = [NSDictionary dictionaryWithObjectsAndKeys:self.dataArray,@"one",self.dataArray1,@"two", nil];


    // 添加头标题
    for (NSArray *arrayIten in self.datadic.allValues) {
        // 从数组中取出第一个元素
        // 判断字典中的元素释放存在,如果存在它的类型是否是数组
        if (arrayIten && [arrayIten isKindOfClass:[NSArray class]] && arrayIten.count) {
            NSString *nameStr = [arrayIten objectAtIndex:0];
            // 判断数组中的元素是否存在,如果存在类型是否为字符串,如果为字符串,判断字符串长短是否为0
            if (nameStr && [nameStr isKindOfClass:[NSString  class]]  && nameStr.length) {
                // 截取字符串的首个字符
                NSString *resultStr = [nameStr substringToIndex:1];
                [self.titleArray addObject:resultStr];
                NSLog(@"%@",resultStr);
            }

        }
    }

   self.navigationItem.title = @"今日头条";
    // 初始化一个UItableView
    //  style:设置单元格的样式  有两种样式:plain(平铺) group(分组)   默认是平铺
    UITableView *tableView = [[UITableView alloc] initWithFrame:CGRectMake(0, 0, CGRectGetWidth(self.view.frame), CGRectGetHeight(self.view.frame)) style:UITableViewStyleGrouped];
    // 设置分割线样式
    tableView.separatorStyle = UITableViewCellSeparatorStyleSingleLine;
    tableView.separatorColor = [UIColor greenColor];
    /**
     UITableViewCellSeparatorStyleNone,
     UITableViewCellSeparatorStyleSingleLine,
     UITableViewCellSeparatorStyleSingleLineEtched
     */
    // 如果我们每个cell的高度是统一的,可以直接使用属性设置
    tableView.rowHeight = 200;
    tableView.backgroundColor = [UIColor orangeColor];
    //UItableView 的代理
    tableView.dataSource = self;
    tableView.delegate = self;
    [self.view addSubview:tableView];
}
2、相关代理
#pragma mark -- 共有多少个分区
// 共有多少个分区 (此方法是可选的,如果不实现该代理方法,默认整个表视图只有一个分区)
- (NSInteger)numberOfSectionsInTableView:(UITableView *)tableView{

    // 返回字典在中元素的个数,作为分区的个数
    return self.datadic.count;
}

#pragma mark -- 每个分区下返回的行数
// 每个分区下返回的行数
- (NSInteger)tableView:(UITableView *)tableView numberOfRowsInSection:(NSInteger)section{
    // 返回所有数据的个数 这里单元格的返回个数一般不写死,将数据源的个数作为返回值,根据数据的数量来创建单元格的数量
//  return [self.dataArray count];

//    // 根据当前所在的分区,取得字典中对应的键
//    NSString *keyString = self.datadic.allKeys[section];
//    NSLog(@"%@",keyString);
//    // 根据键取出对应的值,由于字典的值为数组,所以可以有count属性
//    return [self.datadic[keyString] count];

    // 根据所在分区取出字典中的(值)
    NSArray *array = [self.datadic.allValues objectAtIndex:section];
    return array.count;
}
#pragma mark -- 定义单元格
// 定义单元格    indexPath:单元格当前所在的位置
- (UITableViewCell *)tableView:(UITableView *)tableView cellForRowAtIndexPath:(NSIndexPath *)indexPath{
    // 表视图的重用机制:当表视图的单元格超过一屏幕时,这时就会启动cell重用机制。当滑动时单元格出屏幕时,就会把相同格式的单元格放在同一个集合中,为这个集合添加标识符,当我们需要使用某种样式的单元格时,根据不同的标示符,从集合中寻找单元格

  //出屏幕的cell会被添加到mutableSet中,进入屏幕的cell,先从set中获取,如果获取不到,才创建一个cell。在cell显示之前,给cell赋上相应的内容。

    static NSString *identifier = @"cell";
    // 相当于从集合中找寻完全出屏幕的单元格
    // identifier: 因为一个表视图中可能存在多种样式的单元格,咋们把相同格式的单元格放在同一个集合里,为这个集合加标识符,当我们需要用到某种样式的单元格时,根据不同的标识符,从集合中找寻单元格
    UITableViewCell *cell = [tableView dequeueReusableCellWithIdentifier:identifier];
    // 如果从集合中未找到单元格,也就是集合中还没有单元格,也就是还没有单元格完全出屏幕,那么我们就需要创建单元格
    if (!cell) {
        // 创建cell的时候需要标示符,是因为当该cell触屏幕的时候需要根据标示符放到对应的集合中
        cell = [[UITableViewCell alloc] initWithStyle:UITableViewCellStyleSubtitle reuseIdentifier:identifier];

        /*
         UITableViewCellStyleDefault,    // Simple cell with text label and optional image view (behavior of UITableViewCell in iPhoneOS 2.x)
         UITableViewCellStyleValue1,        // Left aligned label on left and right aligned label on right with blue text (Used in Settings)
         UITableViewCellStyleValue2,        // Right aligned label on left with blue text and left aligned label on right (Used in Phone/Contacts)
         UITableViewCellStyleSubtitle    // Left aligned label on top and left aligned label on bottom with gray text (Used in iPod).

        */

        // 设置cell的style,不涉及到数据的重新赋值,咋们可以在初始化cell的时候给他设定好
        // 设置辅助视图的样式 (枚举值,有多种样式)
        cell.accessoryType = UITableViewCellAccessoryDisclosureIndicator;
        /**
         UITableViewCellAccessoryNone,                                                      // don't show any accessory view
         UITableViewCellAccessoryDisclosureIndicator, //灰色小箭头                                       // regular chevron. doesn't track
         UITableViewCellAccessoryDetailDisclosureButton // 蓝圈号                // info button w/ chevron. tracks
         UITableViewCellAccessoryCheckmark,    // 对号                                              // checkmark. doesn't track
         UITableViewCellAccessoryDetailButton NS_ENUM_AVAILABLE_IOS(7_0)  __TVOS_PROHIBITED // info button.
         */


        // 设置选中后的效果
        cell.selectionStyle = UITableViewCellSelectionStyleNone;
        /**
         UITableViewCellSelectionStyleNone,
         UITableViewCellSelectionStyleBlue,
         UITableViewCellSelectionStyleGray,
         UITableViewCellSelectionStyleDefault
         */

    }
四、UITableView自适应高速
#pragma mark -- 自适应高速
// 返回cell高度的代理方法
- (CGFloat)tableView:(UITableView *)tableView heightForRowAtIndexPath:(NSIndexPath *)indexPath{
    // NSString有一个方法,可以根据内容返回一个矩形大小
    // 代理方法的执行是有顺序的,这里视线执行返回高度的代理方法,在执行创建单元格的代理方法
    // 取得内容
    NSDictionary *dic = [self.dataArray objectAtIndex:indexPath.row ];
    NSString *contentStr = [dic objectForKey:@"content"];
    // 内容自适应高度的方法
    /**
     *  参数解释:
     *  size:是规定文本显示的最大范围
     *  options:按照和中设置来计算范围
     *  taaributes:文本内容的一些属性,例如;字体大小。字体的类型
     *   context:上下文,可以规定一些其他设置,但是一般都是nil
     */

    // 枚举值中的单或(|),意思是要满足所有的枚举值设置
    CGRect rect = [contentStr boundingRectWithSize:CGSizeMake(tableView.bounds.size.width, MAXFLOAT) options: NSStringDrawingTruncatesLastVisibleLine | NSStringDrawingUsesLineFragmentOrigin
attributes:@{NSFontAttributeName:[UIFont systemFontOfSize:15]} context:nil];

    return rect.size.height+60;
}
五、UITableView的编辑(增、删、改) 1、 打开编辑状态
  // 设置导航条右侧编辑按钮,如果设置表视图为可编辑状态,点击此处按钮就会有相应的操作
    self.navigationItem.rightBarButtonItem = self.editButtonItem;
// 设置表视图的编辑状态 (重写系统的方法 ,而不是代理方法)
- (void)setEditing:(BOOL)editing animated:(BOOL)animated{
    [super setEditing:editing animated:animated];
    // 设置tableView为可编辑状态
    [self.tableView setEditing:editing animated:animated];
}
2、 设置课编辑状态下的表视图哪个单元格可编辑,
- (BOOL)tableView:(UITableView *)tableView canEditRowAtIndexPath:(NSIndexPath *)indexPath{
    // 不想首个单元格可编辑
    if (indexPath.row == 0) {
        return NO;
    }
    // 直接返回YES,默认所有单元格都是可以编辑的
    return YES;
}
3. 设置编辑样式
- (UITableViewCellEditingStyle)tableView:(UITableView *)tableView editingStyleForRowAtIndexPath:(NSIndexPath *)indexPath{
    // 让最后一行为插入数据样式
    if (indexPath.row == (self.dataMutableArray.count - 1)) {
        return UITableViewCellEditingStyleInsert;
    }
    // 默认所有的单元格都是删除样式
    return  UITableViewCellEditingStyleDelete;
}
4、编辑(删除,增加)
// 编辑完成之后执行的代理方法
- (void)tableView:(UITableView *)tableView commitEditingStyle:(UITableViewCellEditingStyle)editingStyle forRowAtIndexPath:(NSIndexPath *)indexPath{
    // 此方法根据编辑样式的不同,来做出不同的逻辑操作
    // 如果编辑样式为删除是执行的操作
    if (editingStyle == UITableViewCellEditingStyleDelete) {
        // 先删除当前单元格上现实的数据
        [self.dataMutableArray removeObjectAtIndex:indexPath.row];
        // 删除单元格

        /**
          indexPaths:此参数为数组,数组中的元素类型是NSIndexPath类型,说明此方法可以删除多个单元格
         Animation:删除动作的动画
         */

        [tableView deleteRowsAtIndexPaths:@[indexPath] withRowAnimation:  UITableViewRowAnimationBottom];

    }else if (editingStyle == UITableViewCellEditingStyleInsert){
        // 先增加一条数据
//        [self.dataMutableArray insertObject:@"叼毛兽" atIndex:indexPath.row];
       [self.dataMutableArray insertObject:@"叼毛兽" atIndex:self.dataMutableArray.count - 1];

        // 在增加单元格
        [tableView insertRowsAtIndexPaths:@[indexPath] withRowAnimation:UITableViewRowAnimationBottom];
    }
}
4、编辑(移动单元格)
// 移动单元格

- (BOOL) tableView:(UITableView *)tableView canMoveRowAtIndexPath:(NSIndexPath *)indexPath{
    // 默认YES,所有的单元格都可以移动
    return YES;
}
//
/** 移动完成会执行的代理方法
 *  @param sourceIndexPath  当前移动单元格原来所在的位置
 *  @param destinationIndexPath 移动完成后所在的新位置
 */
- (void)tableView:(UITableView *)tableView moveRowAtIndexPath:(NSIndexPath *)sourceIndexPath toIndexPath:(NSIndexPath *)destinationIndexPath{
    // 把要移动位置的数据先保存起来
    NSString *string = [NSString stringWithString:[self.dataMutableArray objectAtIndex:sourceIndexPath.row]];
    // 删除原来位置的数据
    [self.dataMutableArray removeObjectAtIndex:sourceIndexPath.row];

    // 把此数据插入到数组中新位置
    [self.dataMutableArray insertObject:string atIndex:destinationIndexPath.row];

}
六、成品展示 1、成品 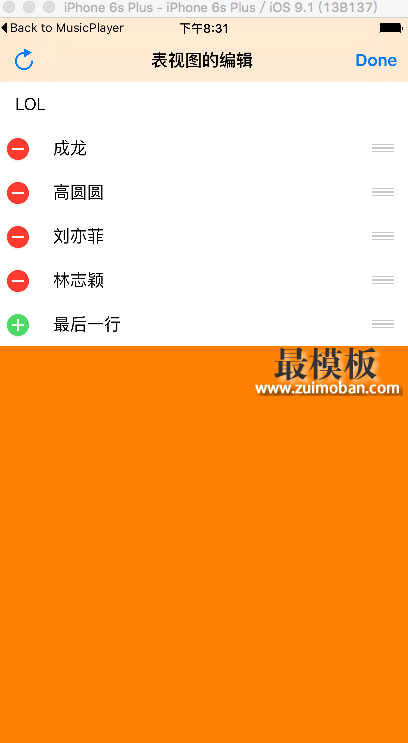
5F11AA6F-8C6A-4990-A753-3C1F72D10F3F.png 2、移动 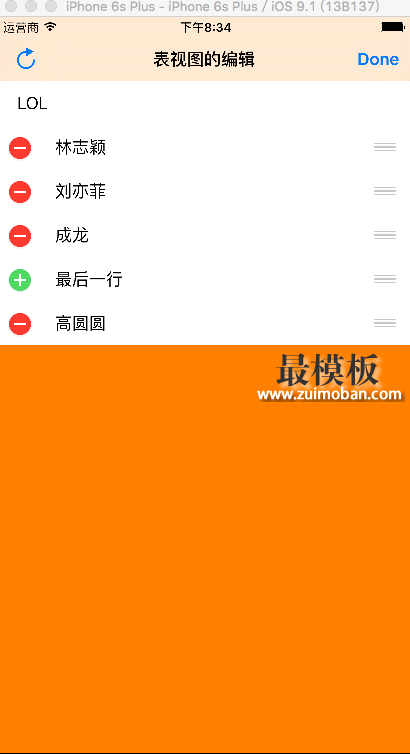
097AA0D8-BBE6-4E8C-A9C1-6EE2235A5DCD.png 3、删除 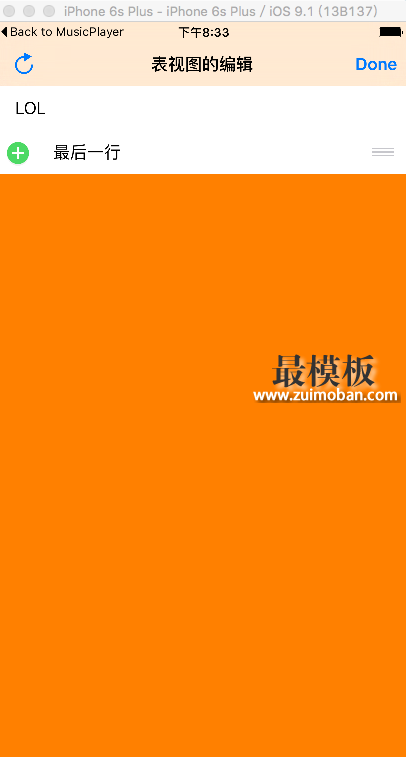
370316CA-B9C5-4844-BC4D-C921B71A0967.png 4、增加 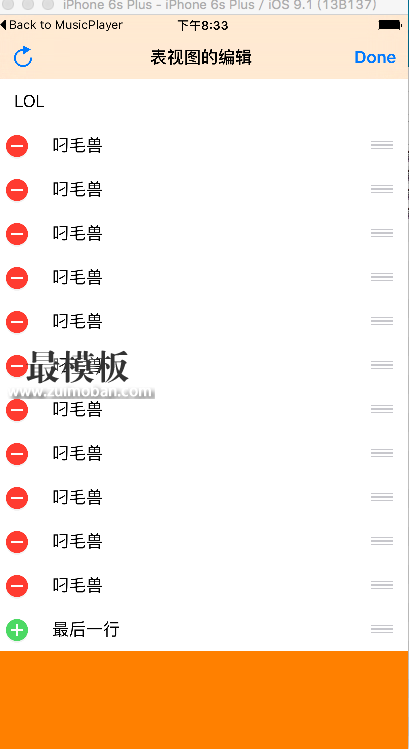
A28C976F-5CA0-43AF-8993-2BA9F3EB148A.png (责任编辑:最模板) |
iOS之表视图UITableView运用技巧
时间:2016-01-07 16:04来源:未知 作者:最模板 点击:次
要提纲: 一、表视图 二、UITableViewCell的重用机制 三、UITableview的相关配置(代理方法) 四、UITableView自适应高速 五、UITableView的编辑(增、删、移动) 六、成品展示 一、表视图(UI
顶一下
(0)
0%
踩一下
(0)
0%
------分隔线----------------------------
- 热点内容
-
- 利用BBRSACryptor实现iOS端的RSA加解密
RSA这种非对称加密被广泛的运用于网络数据的传输,但其在iOS上...
- CAShapeLayer与UIBezierPath(加动画)
1. UIBezierPath: UIBezierPath是在 UIKit 中的一个类,继承于NSObject,可...
- iOS调试之crash log分析
一、crash log的获取 当你的app 在手机上crash的时候,会在手机上自...
- iOS中日期的格式化操作
在和服务器交互数据的时候,使用到 NSDate,无论是将服务器返回...
- 清理ios项目无用的图片资源
项目经过需求的变更,产品迭代,再多次的改版之后,有些不再...
- 利用BBRSACryptor实现iOS端的RSA加解密
- 随机模板
-
-
 ecshop台湾地区分区信息
人气:1162
ecshop台湾地区分区信息
人气:1162
-
 ecshop仿绿森电器数码商城
人气:500
ecshop仿绿森电器数码商城
人气:500
-
 酒美网模板之shopex免费模
人气:3505
酒美网模板之shopex免费模
人气:3505
-
 Monica外贸综合电子商务P
人气:717
Monica外贸综合电子商务P
人气:717
-
 Puro英文综合商城网站mag
人气:169
Puro英文综合商城网站mag
人气:169
-
 亚洲产品外贸ecshop模板
人气:825
亚洲产品外贸ecshop模板
人气:825
-