android 自定义控件属性,学到了TypedArray以及attrs。讲一下流程吧,后续一篇还有应用。 1、attrs文件编写
<?xml version="1.0" encoding="utf-8"?>
<resources>

    <attr name="titleText" format="string" />
    <attr name="titleTextColor" format="color" />
    <attr name="titleTextSize" format="dimension" />

    <declare-styleable name="AuthCodeView">
        <attr name="titleText" />
        <attr name="titleTextColor" />
        <attr name="titleTextSize" />
    </declare-styleable>

</resources>
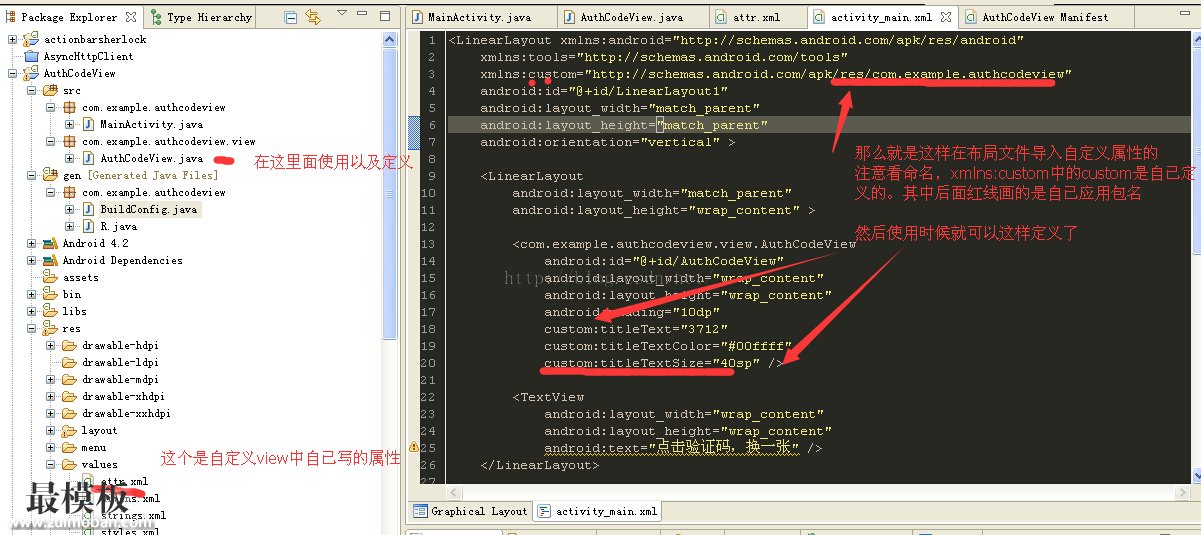
看到这上面的代码有三个属性,首先attr标签是定义名字以及属性。后面是一个declare-styleable组,这个组名字AuthCodeView,后面class中会用到。 2、在xml里面怎么引用以及使用,对比系统空间属性 先看两张图,就了解大半了,也理解大半了。 a、自定义属性的名字的引用
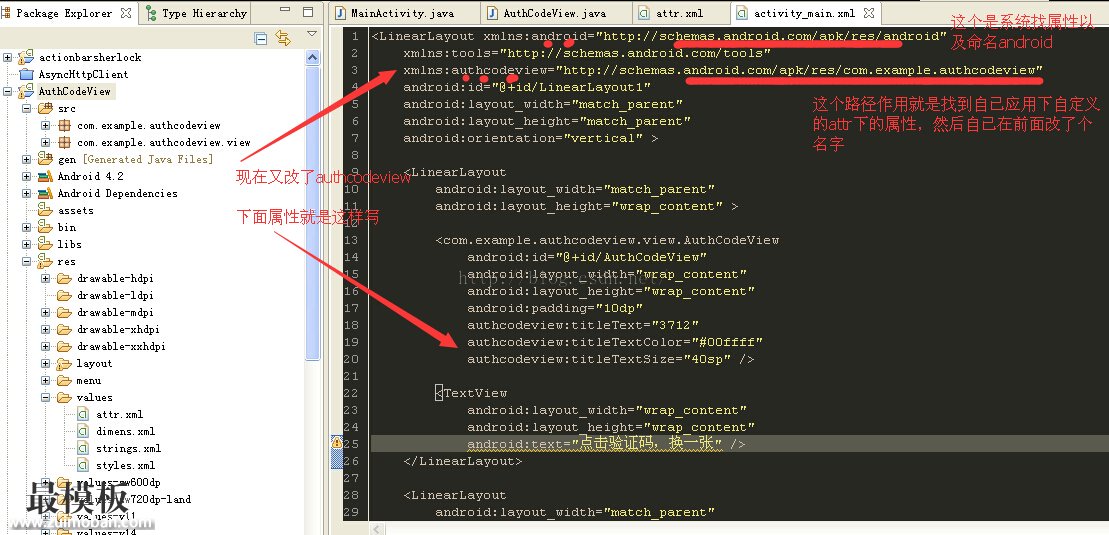
b、仔细看图上说明以及a跟b图的比较。你就知道属性名改变,以及怎么引用。
怕上面图片看不清,附上部分xml代码
<LinearLayout xmlns:android="http://schemas.android.com/apk/res/android"
    xmlns:tools="http://schemas.android.com/tools"
    xmlns:authcodeview="http://schemas.android.com/apk/res/com.example.authcodeview"
    android:id="@+id/LinearLayout1"
    android:layout_width="match_parent"
    android:layout_height="match_parent"
    android:orientation="vertical" >

    <LinearLayout
        android:layout_width="match_parent"
        android:layout_height="wrap_content" >

        <com.example.authcodeview.view.AuthCodeView
            android:id="@+id/AuthCodeView"
            android:layout_width="wrap_content"
            android:layout_height="wrap_content"
            android:padding="10dp"
            authcodeview:titleText="3712"
            authcodeview:titleTextColor="#00ffff"
            authcodeview:titleTextSize="40sp" />

        <TextView
            android:layout_width="wrap_content"
            android:layout_height="wrap_content"
            android:text="点击验证码,换一张" />
    </LinearLayout>

    <LinearLayout
        android:layout_width="match_parent"
        android:layout_height="wrap_content" >

        <TextView
            android:layout_width="wrap_content"
            android:layout_height="wrap_content"
            android:text="输入验证码" />

        <EditText
            android:id="@+id/editText1"
            android:layout_width="match_parent"
            android:layout_height="wrap_content"
            android:ems="10"
            android:inputType="number" >

            <requestFocus />
        </EditText>
    </LinearLayout>

    <Button
        android:id="@+id/button1"
        android:layout_width="match_parent"
        android:layout_height="wrap_content"
        android:text="验证" />

</LinearLayout>
重点看头部layout中xmlns:android="http://schemas.android.com/apk/res/android"这是引用系统属性的作用。 然而 xmlns:authcodeview="http://schemas.android.com/apk/res/com.example.authcodeview"是引用自定义属性。 xmlns:+名称 = "http://schemas.android.com/apk/res/ + 应用的包名" 后面使用时候自定义属性就是这样啦
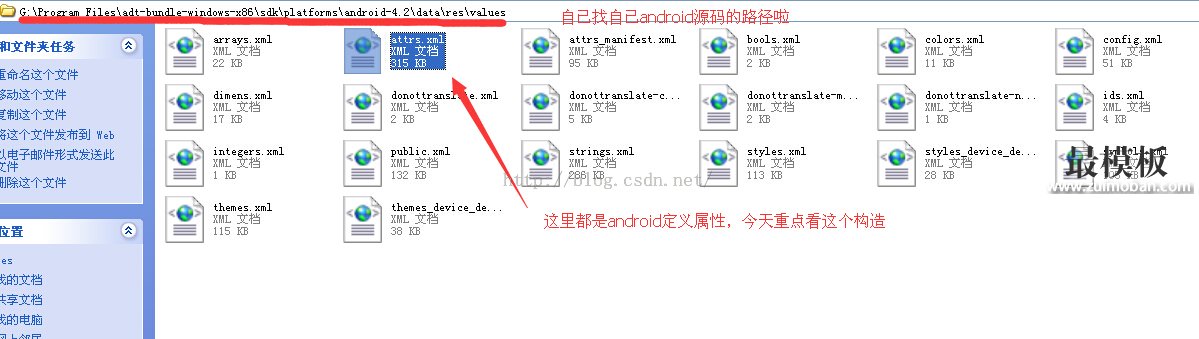
authcodeview:titleText="3712" 顺便附上系统arrs自定义的路径
3、在自定义控件中class怎么引用问题了 看一段代码先
/**
   * 获得我自定义的样式属性
   *
   * @param context
   * @param attrs
   * @param defStyle
   */
  public AuthCodeView(Context context, AttributeSet attrs, int defStyle)
  {
    super(context, attrs, defStyle);
    /**
     * 获得我们所定义的自定义样式属性
     */
    TypedArray a = context.getTheme().obtainStyledAttributes(attrs, R.styleable.AuthCodeView, defStyle, 0);

    //获取在attr文件下,名字为AuthCodeView的declare-styleable属性有几个
    int n = a.getIndexCount();
    for (int i = 0; i < n; i++)
    {
      int attr = a.getIndex(i);
      switch (attr)
      {
      //这个属性可以不要,因为都是随机产生
      case R.styleable.AuthCodeView_titleText:
        mTitleText = a.getString(attr);
        break;
      case R.styleable.AuthCodeView_titleTextColor:
        // 默认颜色设置为黑色
        mTitleTextColor = a.getColor(attr, Color.BLACK);
        break;
      case R.styleable.AuthCodeView_titleTextSize:
        // 默认设置为16sp,TypeValue也可以把sp转化为px
        mTitleTextSize = a.getDimensionPixelSize(attr, (int) TypedValue.applyDimension(
            TypedValue.COMPLEX_UNIT_SP, 16, getResources().getDisplayMetrics()));
        break;

      }

    }
    a.recycle();
    }
这个TypedArray的作用就是资源的映射作用,写法是这样的。R.styleable.AuthCodeView这个是不是很熟悉。 还有R.styleable.AuthCodeView_titleText,后面就是名称加上下横线加上属性。 这样做就把自定义属性在xml设置值映射到class,怎么获取都很简单。 有空格看以去看看生成id的R文件。 这篇先到这里结束,还有这篇的续集,自定义属性控件,也是自定义view。随机验证码demo学习。 (责任编辑:最模板) |
android自定义控件属性TypedArray及attrs
时间:2016-01-20 23:58来源:未知 作者:最模板 点击:次
android 自定义控件属性,学到了TypedArray以及attrs。讲一下流程吧,后续一篇还有应用。 1、attrs文件编写 ?xml version=1.0 encoding=utf-8?resources attr name=titleText format=string / attr name=titleTextColor f
顶一下
(0)
0%
踩一下
(0)
0%
------分隔线----------------------------
- 热点内容
-
- 如何使用AlertDialog和ProgressDialog
AlertDialog是一个带有确定取消按钮的系统弹窗,因为是系统控件...
- Android Bottom Sheet详解
最近android更新了support library, 版本到了23.2, 从官方blog中我们还是...
- Android主题切换方案总结
做了两年多Android应用开发了,期间也实现过好几种主题切换的方...
- Android中viewPager的一两点使用
viewPager是谷歌官方提供的一种方便实现页面滑动效果的控件,可...
- android自定义控件属性TypedArray及at
android 自定义控件属性,学到了TypedArray以及attrs。讲一下流程吧...
- 如何使用AlertDialog和ProgressDialog
- 随机模板
-
-
 ecshop成人用品大气模板
人气:1087
ecshop成人用品大气模板
人气:1087
-
 ecshop仿缤购网上商城
人气:1023
ecshop仿缤购网上商城
人气:1023
-
 ecshop服装批发模板
人气:1389
ecshop服装批发模板
人气:1389
-
 仿2011麦包包shopex模板
人气:810
仿2011麦包包shopex模板
人气:810
-
 dedecms中英双语蓝简企业网
人气:676
dedecms中英双语蓝简企业网
人气:676
-
 ecshop紫色化妆品模板
人气:664
ecshop紫色化妆品模板
人气:664
-